tcl-i • CRACKMONITOR© TYPE TT 1 STANDARD and TT 1 PLUS

tcl – i ● CRACK MONITOR© TYPE TT 1 Standard
co-efficient of thermal expansion 7 x 10⁻⁵
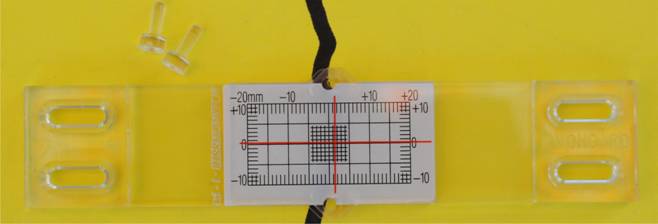
For monitoring deformation within the wall plane. The tcl – i ● CRACK MONITOR© TYPE TT 1 STANDARD consists of two overlapping components, free to move against each other. The lower one carries the calibrated measuring scale, the upper one the calibrated hairline cross. The tcl – i ● RISSMONITOR© TYPE TT 1 Standard is supplied locked in zero position, by means of two plastic locking pins, situated centrally at top and bottom of the measuring scale. To facilitate functioning, these pins must be removed after installation of the monitor. Placed perpendicular across the crack and fixed to the building with the hi-bond adhesive supplied with each monitor, the components will now follow each movement of that portion of wall to which they are attached. This will cause the hairline cross to change position relative to the measuring scale, thus showing magnitude and direction of horizontal, vertical and rotational movement, in any combination these may occur. The line thickness of the measuring scale being 0.2mm, and that of the hairline cross being 0.3mm, facilitate an accuracy of reading better than 0.3mm. By using a measuring lens from the range tcl – i ● OPTOMETRICS, this can be improved to <0,1 mm. The results of the reading (position of the hairline cross relative to the measuring scale) are now being transposed upon the logging card supplied with each monitor, or photographically documented. Successive readings record the magnitude, direction and speed of the deformation. The frequency at which readings should be taken depends upon the actual conditions on site and should be suited to the suspected cause of the cracking. Excavation Work, Pile Driving, Vibro-Compaction or Groundwater Management in the vicinity may necessitate multiple readings per day.

After Installation and Removal of the locking pins, the tcl – i ● CRACK MONITOR©shows horizontal,

vertical,

and rotational deformations,

in whatever combination they may occur.

tcl – i ● CRACKMONITOR© TYPE TT 1 Plus
co-efficient of thermal expansion 7 x 10⁻⁵
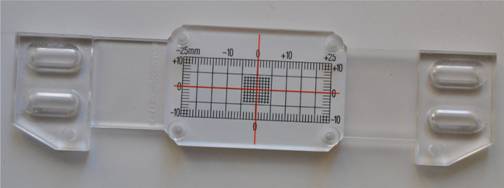
Installation and Function as tcl – i ● CRACK MONITOR© TYPE TT 1 Standard, but with horizontal range +/- 25 mm, locked in zero position with 4 Pins. Two measuring posts facilitate highly accurate measurement of the resultant of all deformation components by means of a digital caliperto 0,01 mm. After installation, it is absolutely vital to remove the four locking pins clearly visible at the four corners of the measuring scale.
The following images show some of the fakes on offer, ranging from Pirate Copies of and significantly inferior to the Original Products,


to Gadgets of absolutely no use at all to the Purchaser.


For more Information about those, just double click the respective Image, or visit